Add to Cart from Shop Page ○ Project Management ○ Form Submissions Now Stored in Contacts
Add to Cart from Shop Page feature
Benefits of this feature:
Better conversion rates - the easier it is to add a product to the cart (fewer clicks), the quicker it is to checkout
Improved repeat customer experience - when you know what you want and you want to jump through fewer hoops!
In this screen capture, you can see 3 versions of a product and how this appears to a visitor depending on how many variants the product has:

Version A: shows a product with a single variant, hence the menu to select a size
Version B: shows a product with multiple variants, hence the button text displays “view options” which will take the visitor to the product details page
Version C: shows a product without any variants, hence the button text displaying “add to cart”
How to enable this feature:
While looking at your Website’s pages, select the Shop collection you want to enable this feature for.
At the top left click on Edit to enter Editing Mode for the page
Next, scroll down to the section that displays your product thumbnails. Click on Edit Section
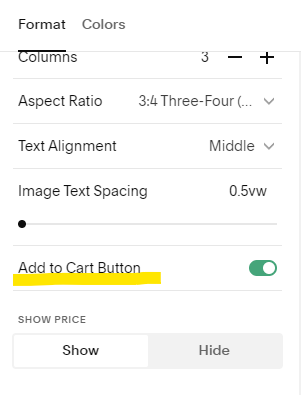
Scroll down in the menu until you see the “Add to Cart” button > toggle this on so that it appears green like so:
Save your changes and you’re done!
FYI: The button styling will use your settings for the Primary Button set up in the Site Styles, and the color and font of the dropdown menu uses the same color and font as your product price.
What Project Management does:
Project Management inside of Squarespace is a very basic way of managing a project through your website by connecting submitted form data, project milestones, and invoicing in one place.
However, this is not a fully-fledged CRM or project management tool. When I say “basic,” I mean really basic.
How to Start a Project:
The quickest way to get started is to go to the Selling menu (or hit the “/” key and type selling)
Next, click on Invoicing
At the top, choose Projects
To the right, you will see a button for “New” > Click it and choose Project
From there, you have an option to click on Add New Client or Select Existing Client. Anyone who has submitted a form on your website should appear on this list.
Now you have a project for this contact that gives you a basic overview of information you may need for this client. However, if you’re used to a more robust Client Relationship Management tool, you will quickly learn that this tool isn’t all that. Will it be more robust in the future? Time will tell!
Here’s a screen capture of the “project” I created for Janie Dough:
IMAGE
As you can see, the “project” only gives you the most basic features for seeing a visitor’s form submissions, key milestones (that are manually generated by you), invoices and their payment status, and a box for notes. Depending on your needs, this may be enough, but in its current state, this isn’t fully valuable to me as a business owner. I am curious to see how this feature may develop in the future, though!
What the Form Submissions Now Stored in Contacts feature does:
In short, now when someone submits data through a form on your website, a profile for this visitor is created in Contacts, and it's easy to tie this information to a Project. Before, you had to connect your form submissions to a 3rd party tool (such as a Google Worksheet) to see customer info and form submissions at a glance.